 TORAT
TORAT
WordPressの投稿ページ、カスタム投稿ページにメディアアップローダを使って画像のアップロード機能を追加する方法をご紹介します。

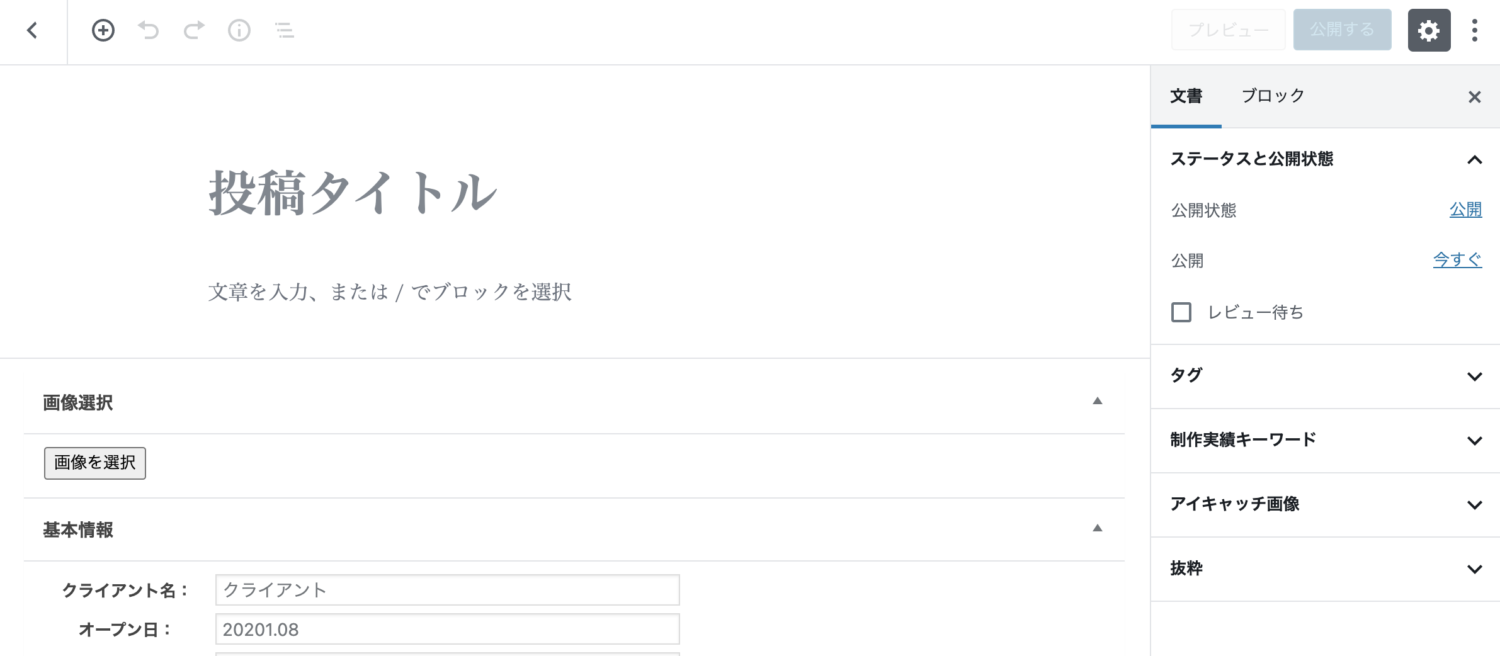
このようにWordPressの管理画面へカスタムフィールドを追加し、画像のアップロード項目を作り、フロントで表示させたいと思います。
使用方法としては、ここで追加した画像を投稿個別ページの上部にスライダーとして表示させるという目的で今回は作成しました。
フロント出力コード
slick.jsを使い画像をスライダー表示させ、さらにサムネイルも表示をするコードです。
functions.phpへコードを追加します。
//投稿ページへ表示するカスタムボックスを定義する
add_action('admin_menu', 'add_custom_inputbox');
//入力したデータの更新処理
add_action('save_post', 'save_custom_postdata');
//#################################
//表示用
//#################################
function image_up($contentData){
     if(is_single()){
  //IDを取得
  $id = get_the_ID();
  //カスタムフィールドの値取得
  $custom = get_post_meta($id, "imageUp", true);
	//スタイルシート+html

	echo '<div>
	<div id="slick-image-leng" class="slider_thumb slider">';

  //出力処理
  foreach($custom as $img){
		echo "<div><img src={$img} /></div>";
  }
  echo "</div>";


	echo '<div class="thumb">';
	foreach($custom as $img){
		echo "<div><img src={$img} /></div>";
	}
	echo '</div>';
	return $contentData;
     }
}
画像の出力のみの場合は、このような出力コードで良いかと思います。
function image_up($contentData){
  if(is_single()){
  //IDを取得
  $id = get_the_ID();
  //カスタムフィールドの値取得
  $custom = get_post_meta($id, "imageUp", true);


  //画像の出力処理
  foreach($custom as $img){
		echo "<div><img src={$img} /></div>";
  }
  echo "</div>";

	return $contentData;
    }
}
管理画面の表示用
管理画面のアップロード項目の追加するコードです。
こちらもfunctions.phpへ追加します。
//#################################
//投稿ページ用
//#################################
//投稿ページに表示される"入力欄その1"の設定
function add_custom_inputbox() {
    add_meta_box(
    'imgaeUpid',
    '画像選択',//カスタムフィールドのタイトル
    'image_up_field',
    'post',//表示させたい投稿のpostタイプ
    'normal' );
    add_action('admin_print_scripts', 'admin_scripts');
}

//投稿ページに表示されるカスタムフィールド
function image_up_field(){
       $id = get_the_ID();
       //カスタムフィールドの値を取得
       $imageUp = get_post_meta($id,'imageUp',true);
       $imgHtml="";
       foreach($imageUp as $akey => $img){
    $imgHtml.=<<<EOS
     <div id="img_{$akey}">
        <a href="#" class="imageUp_remove">削除する</a>
      <br /><img src='{$img}'/>
      <input type='hidden' name='imageUp[]' value='{$img}' />
    </div>
EOS;
       }
       echo <<<EOS
        <style type="text/css">
        #imageUps div{
      float:left;
      margin: 10px;
      height: 120px;
      overflow:hidden;
        }
        #imageUps img{
            max-width: 100px;
            max-height: 100px;
            border: 1px solid #cccccc;
        }
        .imageUpEnd{
      clear:left
  }
        </style>

        <div class="wrap">
         <button id="mediaBtn" type="button">画像を選択</button>
         <div id="imageUps">{$imgHtml}</div>
         <div class="imageUpEnd"></div>
        </div>
EOS;
}

function admin_scripts(){
    wp_enqueue_media(); // メディアアップローダー用のスクリプトをロードする

    // カスタムメディアアップローダー用のJavaScript
    wp_enqueue_script(
        'my-media-uploader',

  //**javasctiptの指定
        get_bloginfo( 'stylesheet_directory' ) . '/js/imageUp-uploader.js',

        array('jquery'),
        filemtime(dirname(__FILE__).'/js/imageUp-uploader.js'),
        false
    );
}

//#################################
//更新処理
//#################################
/*投稿ボタンを押した際のデータ更新と保存*/
function save_custom_postdata($post_id){
  //入力した値(postされた値)
  $imageUp=isset($_POST['imageUp']) ? $_POST['imageUp']: null;
  //DBに登録してあるデータ
  $imageUp_ex = get_post_meta($post_id, 'imageUp', true);
  if($imageUp){
    update_post_meta($post_id, 'imageUp',$imageUp);
  }else{
    delete_post_meta($post_id, 'imageUp',$imageUp_ex);
	}
}
JavaScriptファイルの追加
imageUp-uploader.jsという名前でJSファイルを追加します。
jQuery(document).ready(function($){
var custom_uploader;
/*##############################*/
/* 画像選択ボタンがクリックされた場合の処理。*/
/*##############################*/
$('#mediaBtn').click(function(e) {
e.preventDefault();
if (custom_uploader) {
custom_uploader.open();
return;
}
custom_uploader = wp.media({
title: '画像を選んでください。',
// 以下のコメントアウトを解除すると画像のみに限定される。
library: {
type: 'image'
},
button: {
text: '選択'
},
multiple: true // falseにすると画像を1つしか選択できなくなる
});
custom_uploader.on('select', function() {
var images = custom_uploader.state().get('selection');
var date = new Date().getTime();
images.each(function(file){
img_id = file.toJSON().id+"_"+date;
$('#imageUps').append('<div id=img_'+ img_id +'></div>')
.find('div:last').append('<a href="#" class="imageUp_remove">削除する</a><br />'
+'<input type="hidden" name="imageUp[]" value="'+file.toJSON().url+'" />'
+'<img src="'+file.toJSON().url+'" />');
});
});
custom_uploader.open();
});
/*##############################*/
/* 削除がクリックされた場合の処理。*/
/*##############################*/
$( ".imageUp_remove" ).live( 'click', function( e ) {
e.preventDefault();
e.stopPropagation();
img_obj = $(this).parent();
if(img_obj.length >0){
img_obj.remove();
}
});
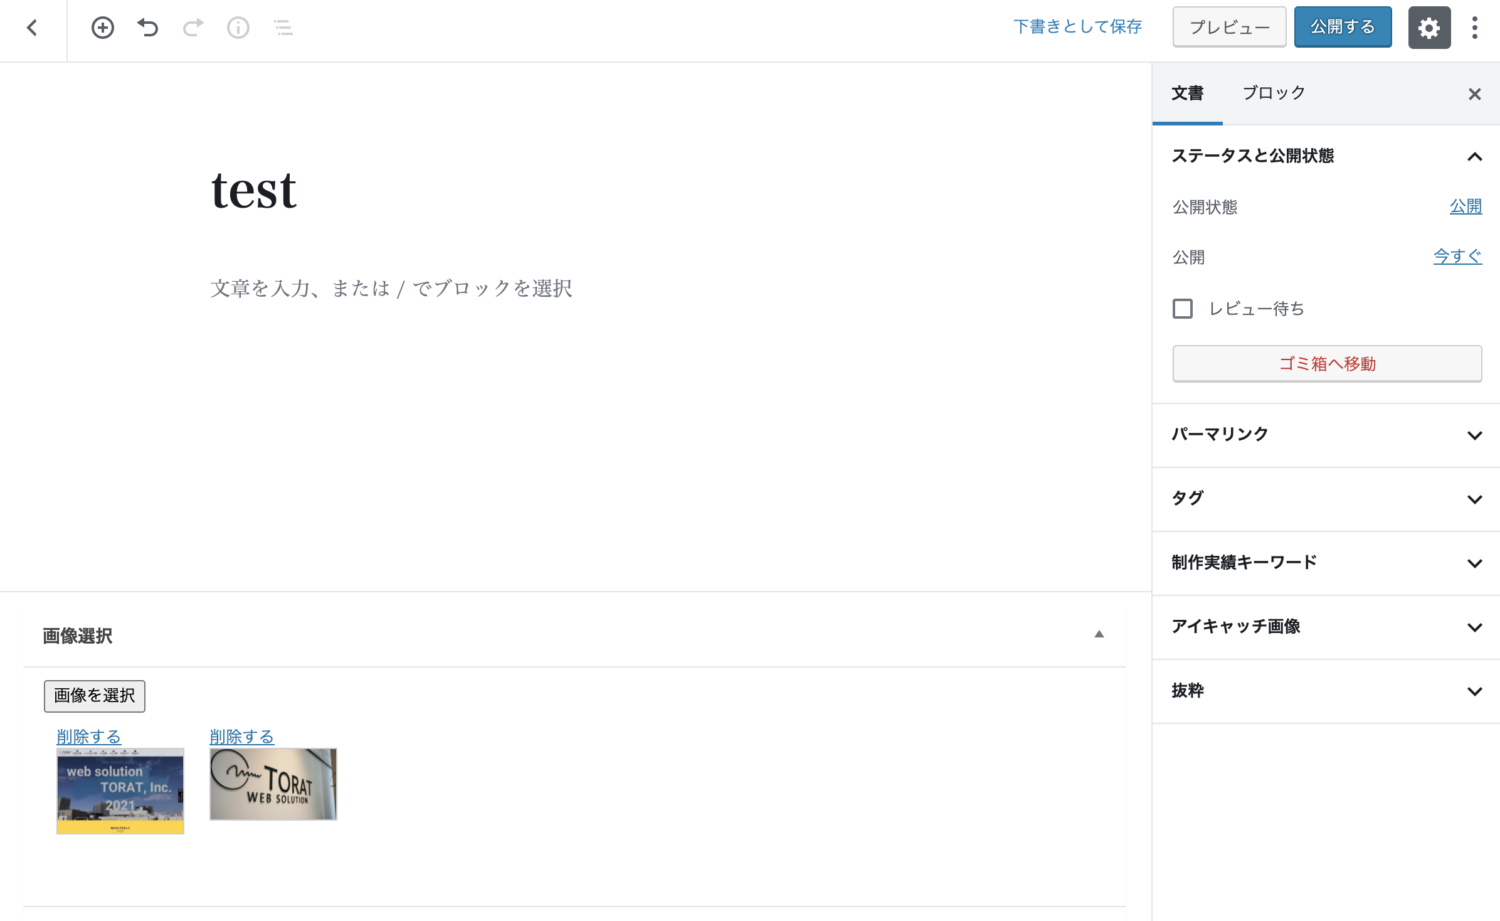
});WordPress管理画面で機能の確認
WordPress管理画面の投稿ページに画像選択のフィールドが追加されていると思います。「画像を選択ボタン」を押してメディアアップローダが表示されるか確認してください。

このようにメディアアップローダが表示されたら画像を選択します。
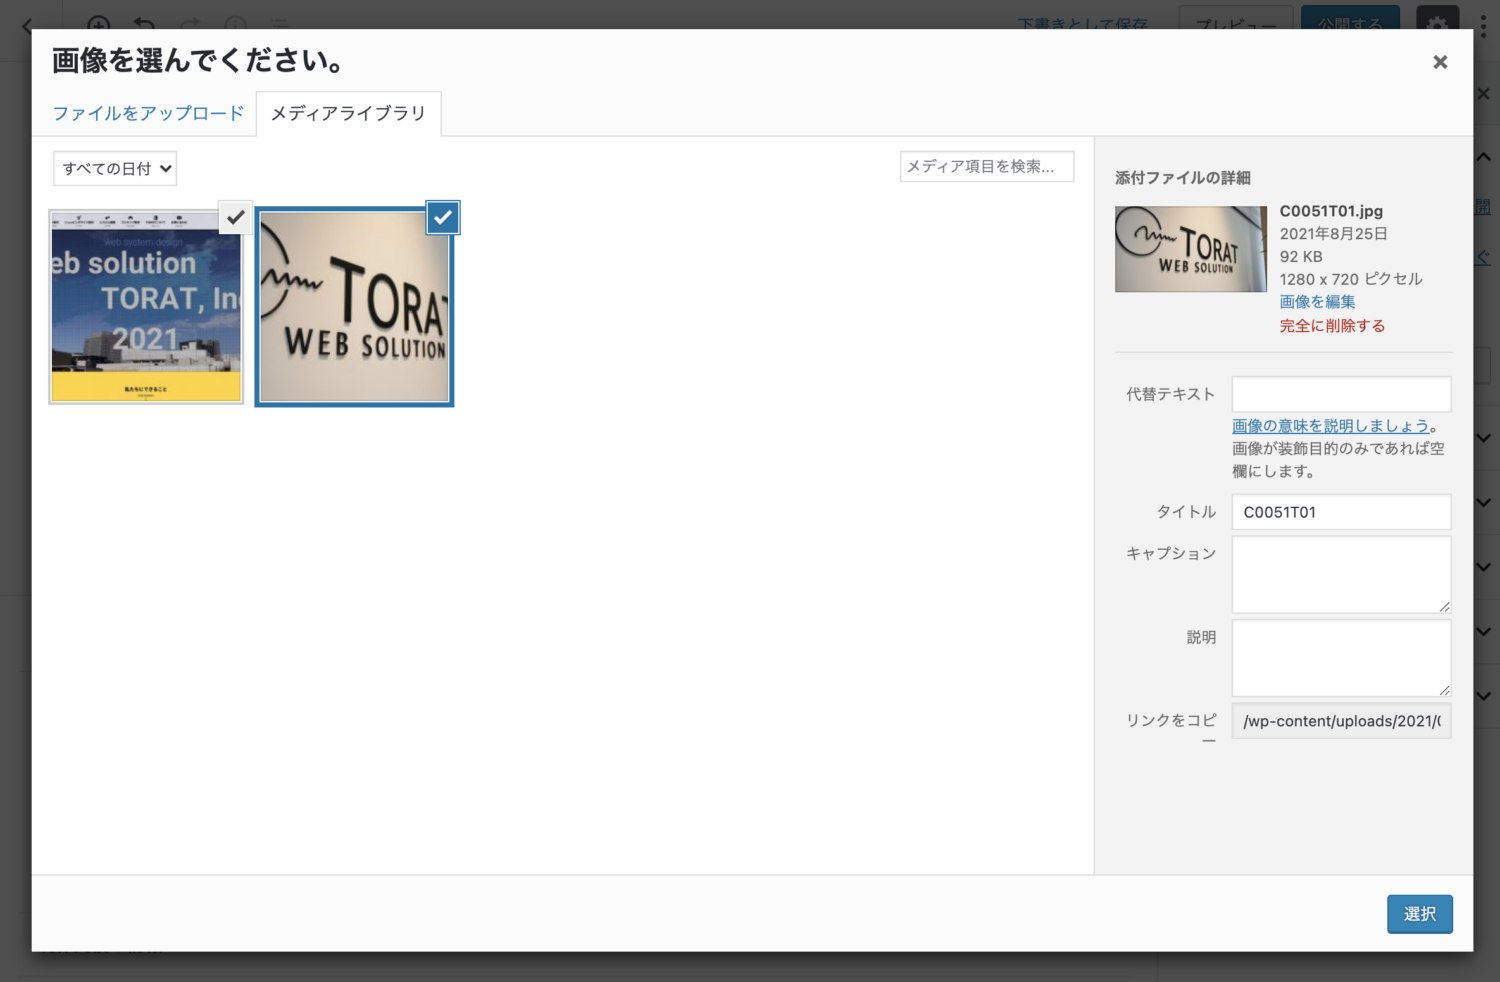
選択画像は下記のように表示されます。削除するボタンで削除、画像を選択ボタンを押下すると画像を追加できます。
フロントで表示させる
フロント側で表示させるには、functionsで追加した関数を追加したい場所で呼び出してあげます
<?php image_up(''); ?>
今回はslick.jsを使用してスライダーとサムネイル表示を実装しました。