shopifyのテーマカスタマイズは管理画面のコードエディタからでも編集できますが、Theme kitと使ってローカルで編集することもできます。今回はTheme kitを使ってローカルで開発環境を構築する方法を紹介します。
ローカルに環境構築することで、使い慣れているエディタで編集することができます!
環境:windows10
shopifyテーマ:Dawn4.0.0
Theme kitってなに?
Theme kitとはshopifyのテーマを開発するためのコマンドラインツールです。
shopifyのTheme kitを使うことでリアルタイムで確認しながら開発を行うことができます。
さっそくTheme kitをインストールしていきましょう!
Theme kitのインストール
Theme kitのインストールにはChocolatey(macの場合はhomebrew)が必要になりますのでまだインストールしていない方はインストールしてください。
下記コマンドを実行してTheme kitをインストールします。
choco install themekit下記コマンドでTheme kitがインストールされているか確認できます。
theme help 問題なくインストールされている場合はこのように表示されます。
 kit for manipulating shopify themes

Theme Kit is a fast and cross platform tool that enables you to build shopify themes with ease.

Complete documentation is available at https://shopify.dev/tools/theme-kit.

Usage:
  theme [command]

Available Commands:
  configure   Create a configuration file
  deploy      deploy files to shopify
  download    Download one or all of the theme files
  get         Get a theme and config from shopify
  help        Help about any command
  new         New will generate a new blank slate theme in the same directory where it gets called from and create a new theme on Shopify with those files.
  open        Open the preview for your store.
  publish     publish a theme
  remove      Remove theme file(s) from shopify
  update      Update Theme kit to the newest version.
  version     Print the version number of Theme Kit
  watch       Watch directory for changes and update remote theme

Flags:
      --allow-live                     Will allow themekit to make changes to the live theme on the store.
  -c, --config string                  path to config.yml (default "C:\\WINDOWS\\system32\\config.yml")
  -d, --dir string                     directory that command will take effect. (default current directory)
  -e, --env stringArray                environment to run the command (default [development])
  -h, --help                           help for theme
      --ignored-file stringArray       A single file to ignore, use the flag multiple times to add multiple.
      --ignores stringArray            A path to a file that contains ignore patterns.
      --no-ignore                      Will disable config ignores so that all files can be changed
      --no-theme-kit-access-notifier   Stop theme kit from notifying about Theme Kit Access.
      --no-update-notifier             Stop theme kit from notifying about updates.
  -p, --password string                theme password. This will override what is in your config.yml
      --proxy string                   proxy for all theme requests. This will override what is in your config.yml
  -s, --store string                   your shopify domain. This will override what is in your config.yml
  -t, --themeid string                 theme id. This will override what is in your config.yml
      --timeout duration               the timeout to kill any stalled processes. This will override what is in your config.yml
      --vars string                    path to an file that defines environment variables
  -v, --verbose                        Enable more verbose output from the running command.

Use "theme [command] --help" for more information about a command.
Theme Kit Accessアプリでパスワードを作成する
Theme Kit Accessアプリのインストール
Theme Kit Accessからアプリをインストールします。
インストールができたら管理画面のTheme kit Accessページを開いてください。

パスワードの作成する
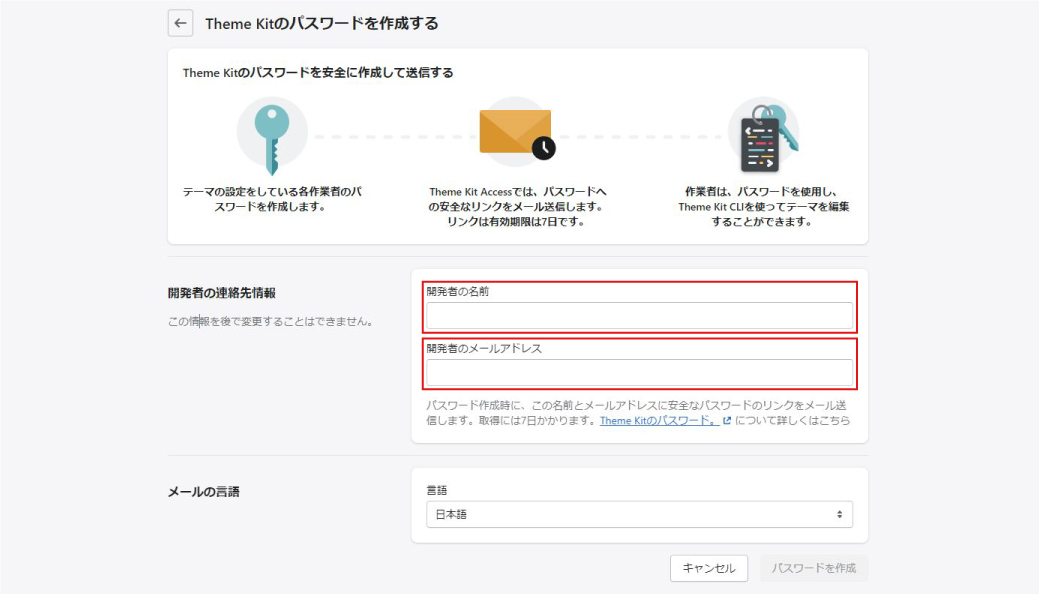
「Theme kitのパスワードを作成する」からパスワードを作成していきます。
開発者の名前と開発者のメールアドレスを入力して「パスワードを作成」をクリックしてください。
ここに入力したメールアドレスにパスワードが送られていきます。
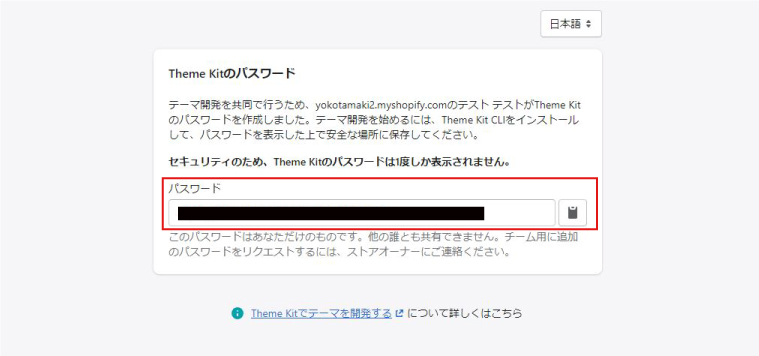
パスワードを作成するとパスワードが送られてきます。
パスワードは一度しか表示されないため必ずメモしておいてください。
テーマIDを取得してローカルにshopifyの開発環境を構築する
・テーマを1から開発する場合
・既存のテーマを土台にしてカスタマイズする場合
の2パターンがあります。
既存のテーマを土台にしてカスタマイズする場合
下記コマンドを実行してください。※[]は不要
theme get --list -p=[先ほど取得したパスワード] -s=[ストアのURL]ストアのURLは●●●●.myshopify.comのドメインです。独自ドメインではないので注意してください。
コマンドを実行するとオンラインストア>テーマ>テーマライブラリーにあるテーマが表示されます。
[live]が現在適用されているテーマです。
Available theme versions:
  [111111111111] [live] テーマ1
  [222222222222] テーマ2
  [333333333333] テーマ3
ここまでできたら早速テーマをダウンロードしていきましょう!
まずテーマをダウンロードする用の空のフォルダを作成してください。ダウンロードしたいファイル直下で下記コマンドを実行して下さい。
themeidにダウンロードしたい取得IDに置き換えて実行するとダウンロードが始まります。※[]は不要
theme get --password=[取得したパスワード] --store=[ストアのURL] --themeid=[先ほど取得したテーマID]これで既存のテーマをローカルに開発環境の接続は完了です!
テーマを1から開発する場合
まずテーマをダウンロードする用の空のフォルダを作成してください。フォルダの名前はテーマの生wと同じ方が管理しやすいかと思います!そして、ダウンロードしたいファイル直下で下記コマンドを実行して下さい。
theme new --password=[取得したパスワード] --store=[ストアのURL] --name=[テーマの名前]このように表示されたら問題なくダウンロードできています。
[サイト名] theme created
[サイト名] config created
Created layout.
        Created layout\theme.liquid.
Created locales.
        Created locales\en.default.json.
Created templates.
        Created templates\list-collections.liquid.
        Created templates\page.contact.liquid.
        Created templates\product.liquid.
        Created templates\search.liquid.
        Created templates\404.liquid.
        Created templates\collection.liquid.
        Created templates\gift_card.liquid.
        Created templates\index.liquid.
        Created templates\page.liquid.
        Created templates\article.liquid.
        Created templates\blog.liquid.
        Created templates\cart.liquid.
        Created templates\collection.list.liquid.
Created templates\customers.
        Created templates\customers\addresses.liquid.
        Created templates\customers\login.liquid.
        Created templates\customers\order.liquid.
        Created templates\customers\register.liquid.
        Created templates\customers\reset_password.liquid.
        Created templates\customers\account.liquid.
        Created templates\customers\activate_account.liquid.
Created assets.
        Created assets\application.css.liquid.
        Created assets\application.js.
Created config.
        Created config\settings_data.json.
        Created config\settings_schema.json.
[サイト名] uploading new files to shopify
[development] 26|26 [==============================================================================]  100 %
[development] 26 files, Updated: 26
これで基本的なテンプレートをローカルにダウンロードすることができ、shopifyに新しいテーマが生成されます。
Theme kitを使って編集したテーマを反映させる
テーマを編集したらコマンドを使って反映させる必要があります。
theme watch --allow-liveこのコマンドを実行中は編集したファイルをサーバーへ反映させることができます。Ctrl+Cで解除することができます。
その他のコマンド
theme open・・・ブラウザでテーマのプレビューを開きます。
theme watch・・・ファイルの監視して、編集したファイルをアップロードします。
theme deploy・・・テーマを置き換えます。

 TORAT
TORAT

